One of the challenges that virtual school has brought to our house is technology. We tried to prepare before school started but just like everyone else, we're still learning what works and adapting as we go.
With so many people using our network on 3 different floors of the house, we opted for a WiFi extender to make sure that everyone stays connected. A WiFi extender takes the signal that your router is putting out and amplifies it to cover a larger area. You can get one online or at most local electronic stores. WiFi extenders typically start at about $40 and can go up past $400 depending on how much coverage you want and how far the signal needs to reach.
Most of our teachers have offered to provide packets to pick up each week with worksheets and other materials that our students need. However sometimes things pop up that they would like us to print. Of course you have to add a printer in order to be able to print from home. I've done it on 3 Chromebooks, so let me share the steps with you. (note: If you have installed the printer on a borrowed device, but continue to get printer errors, check with your school. It is possible that they have blocked printing from borrowed devices)
How to add a printer to your Chromebook:
The easiest way to add a printer is by plugging the printer to the Chromebook using a USB cable and following the directions on the screen.
To add your printer to your Chromebook without a USB cable:
1) at the bottom right click on the time
2) when the box opens, click the settings icon
3) at the bottom click "advanced"
4) under "printing" select "printers"
5) Under "available printers to save" find your printer and click "save"
While I typically use Zoom for virtual meetings, our school system uses Google Meets. Being unfamiliar with Google Meets, I have had a lot to learn over the last few days. I have complied some tips I've learned that will hopefully help you out. (The easiest way to follow the directions is to split your screen so the instructions and the open Google Meet window are side-by-side)
Google Meets
1. Sync
First, If you have borrowed a device from your school, be sure to check to make sure that "Sync" is on. This allows the school system to add things, like Chrome extensions, to your device meaning that everything you need may already be installed.
To check to make sure that it is turned on, do the following:
(1) Open Chrome
(2) click the 3 dots in the top right corner
(3) click settings
(4) click Sync and Google Services
(5) click Manage what you sync
(6) choose Sync all.
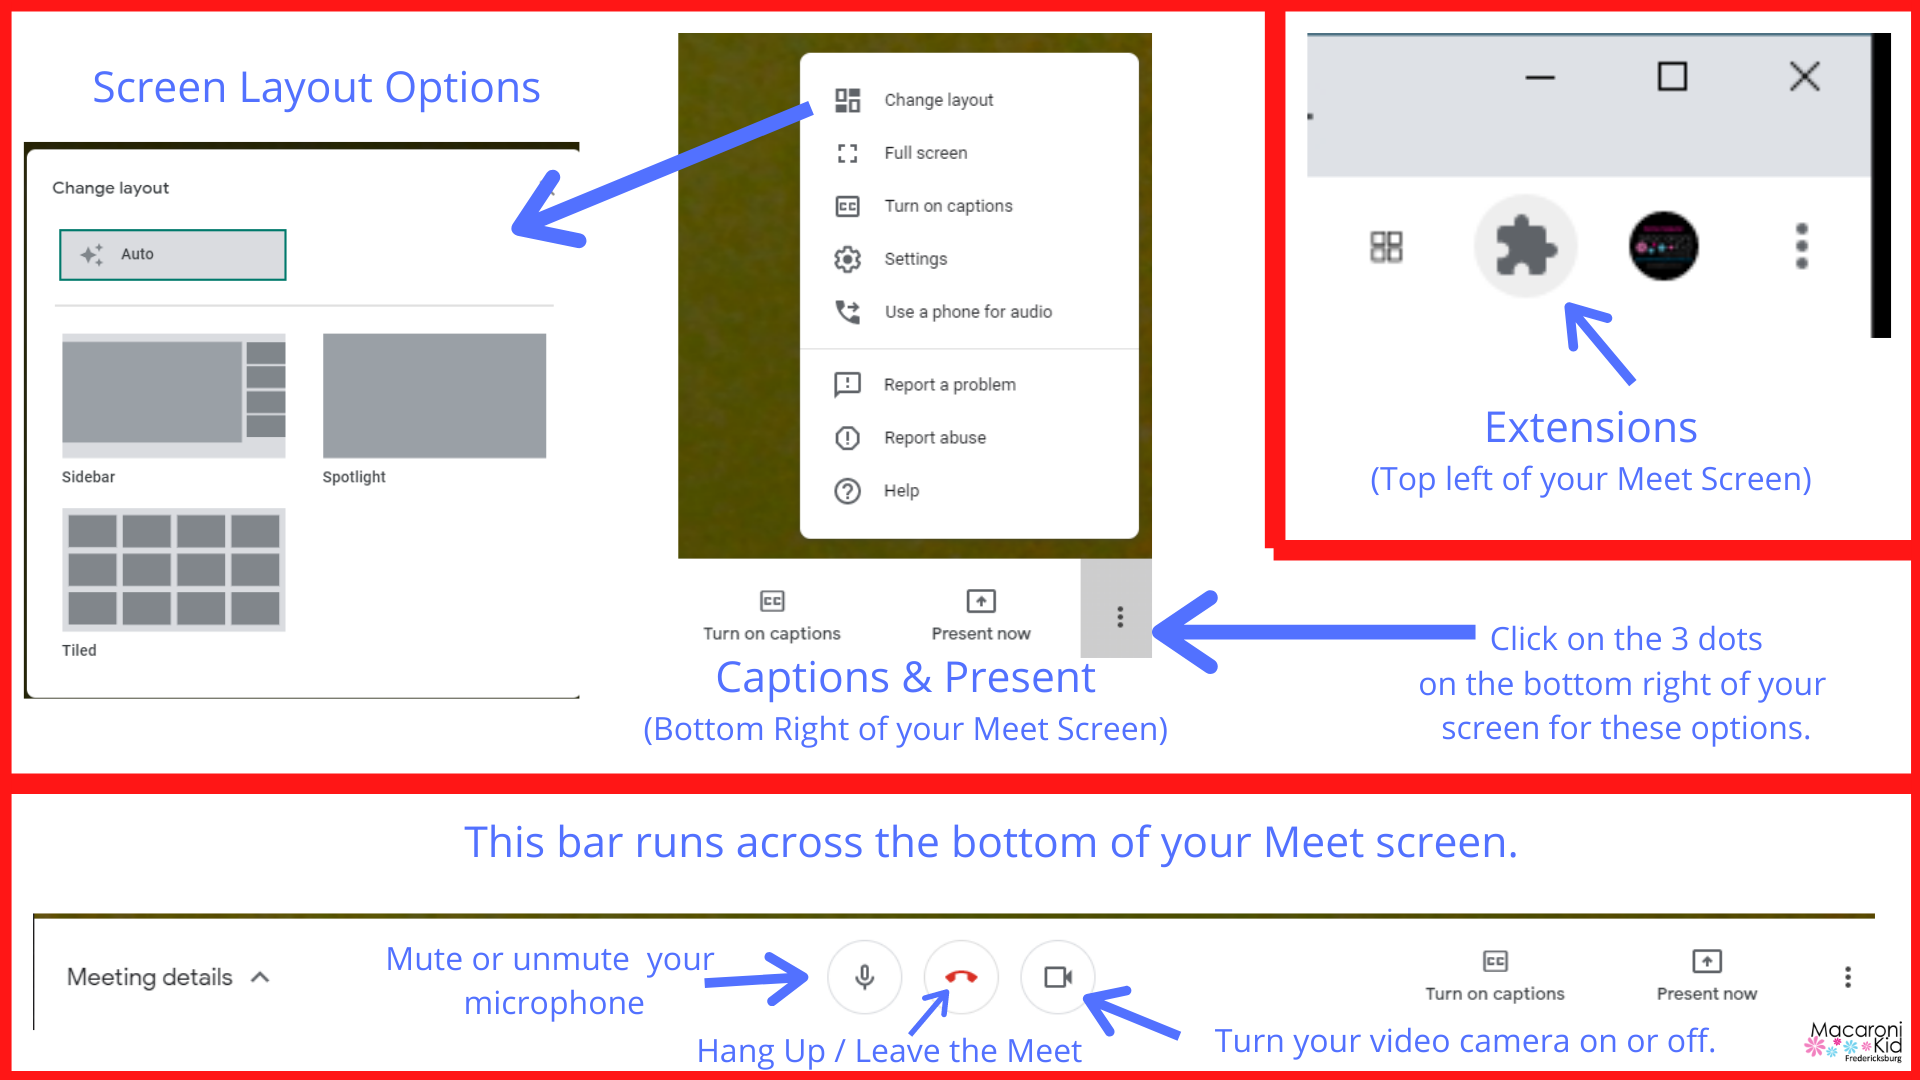
2. Extensions:
If you are using your own device, or need to add the extensions yourself, you can do that in the Chrome Store. Some suggested extensions include:
"Push To Talk" - during Google Meet, this allows you to push the space bar to unmute yourself and speak. Once you release the space bar, it automatically mutes you again. This is much easier than finding and clicking the little mute circle each time.
"Grid View" - This allows you to choose to view the Google Meet as a grid so that you can see everyone who is attending.
"Nod" - this allows you to click on an icon to show that your hand is raised without having to sit there holding up your hand. Obviously this will only be useful if it's something that the teacher wants to use.
3. Resolution:
High resolution provides a better call experience. If you are on WiFi with a good connection, be sure your resolution is set to high (720p). Set your resolution lower for poor network connections or when there is limited data available. (Google Meet typically defaults to the lower, 360p setting.)
To set your resolution:
(1) click settings
(2) click "send" or "receive" resolution
(3) choose from 360p or 720p
(4) click "done"
4. Set your View:
Google Meet comes with 3 built in options. These can be changed at any time during the Meet.
(1) Auto: Meet chooses the layout
(2) Tiled: shows up to 16 people with the most active people showing on the side
(3) Spotlight: the active person or presentation will fill the window; Sidebar: the active person is shown large with other participants on the side
Grid view is also an option and can be added as an Extension. (see directions above)
5. Other useful info:
(1) "Pin" - When you hover over your teacher's Meet box, you can click on the icon that looks like a push pin. This will make sure that your teacher is always one of the boxes that is shown during your meeting. (This does not work on mobile)
(2) Subtitles is an available option. To turn on subtitles simple click on the "Turn on Captions" button at the bottom.
(3) Share your screen. This option may be useful for older children. Once in the meeting, click on the "Present now" button at the bottom. This will prompt you to choose from "entire screen" (everything that you see on your screen will be visible to everyone attending the meeting) or "window" (you select which window you share with the meeting).
(4) Does your video image seem dark? Lots of times the overhead lights or windows cause back lighting and makes it difficult for the video camera to pick up a good image. Try a desk light. This allows the teacher to see your child's reactions and facial expression during class. It also helps when the kids are writing on dry erase boards and holding them up for teachers to see during class.
Keyboard Shortcuts:
| Ctrl + alt + C | Show or hide chat |
| Ctrl + D | Mute or unmute your microphone |
| Ctrl + E | Turn your camera on or off |
| Ctrl + alt + P | Show or hide people |
| Ctrl + / | Help |